
As the months of quarantine drag on, you might be ready for a way to shake up an endless stream of Zoom meetings. Or maybe you’d like a unique way to meet up with friends. Mozilla Hubs might be a great choice — and is one that allows you to socialize in VR while supporting other participants on mobile devices or laptops.
With Hubs, you can create an immersive 3D social space, with built-in features that allow you to watch videos, give presentations, or just experience some virtual water cooler chat. It’s free, painless to set up, and is a great way to get started creating social VR — even if you don’t have any prior experience.
Hubs rooms are ready to go ‘out of the box,’ but if you’d like more fine-grained control of the space you’re using for your meeting or event, you can use the Spoke tool to create a room that’s customized for your needs. If you’re interested in WebVR but don’t have experience with web technologies, Spoke is a way to create quite sophisticated VR using straightforward tools — and it’s probably the only way that realistically strips away the complications of multiplayer and art asset sourcing.
Here, I’ll give a quick overview of how Hubs works, and then go into how you can create with Spoke.
Origins
WebXR is a way to experience AR or VR through a regular web browser and a headset or mobile XR setup. Mozilla (the organization behind Firefox) has long been at the cutting edge of WebXR, and has been a key player in designing WebXR standards, as well as the first major organization to provide a full range of WebXR functionality in its Firefox browser.
Hubs has been available since mid-2018, but it wasn’t until Covid-19 quarantine that I took closer note, as I looked for ways my nonprofit community could interact and continue connecting.
Although there are VR-focused social applications that enable 2D mode, such as Altspace (https://altvr.com/) , these have the added friction of requiring a separate application download — with Hubs Rooms (as with all WebXR experiences), all your users need to get started is a URL. This is what prompted me to look more closely at Hubs.
My recent experience with Hubs caught me by surprise — I didn’t realize how much progress WebXR has made in just the last year or so. While previously I’d thought meaningful WebVR was several years away at least, Hubs convinced me that it’s time has come.
The editing experience in Spoke is also painless, and allows customization and sharing that does not rely on deep knowledge of 3D applications or VR UX design. Instead, a relative novice can create a meaningful cross-platform VR/PC/Mac/Mobile experience that can bridge some of the barriers that occur when we work and socialize remotely.
Hubs Overview
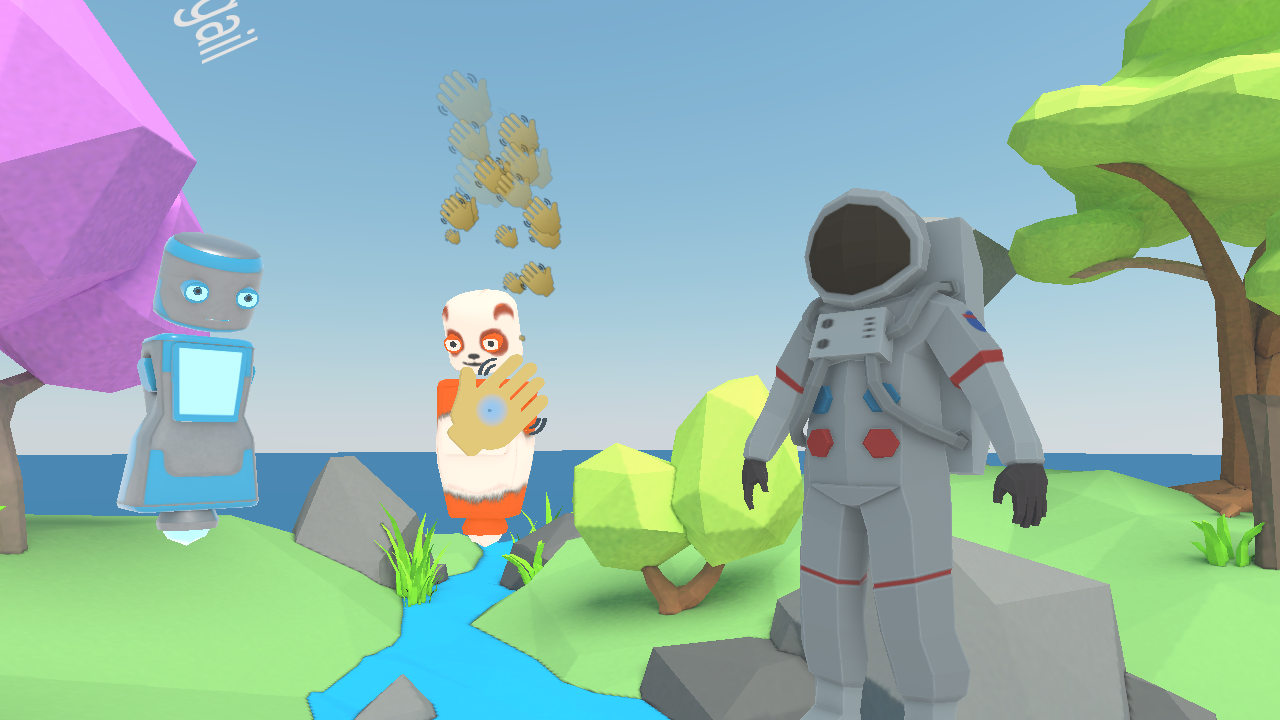
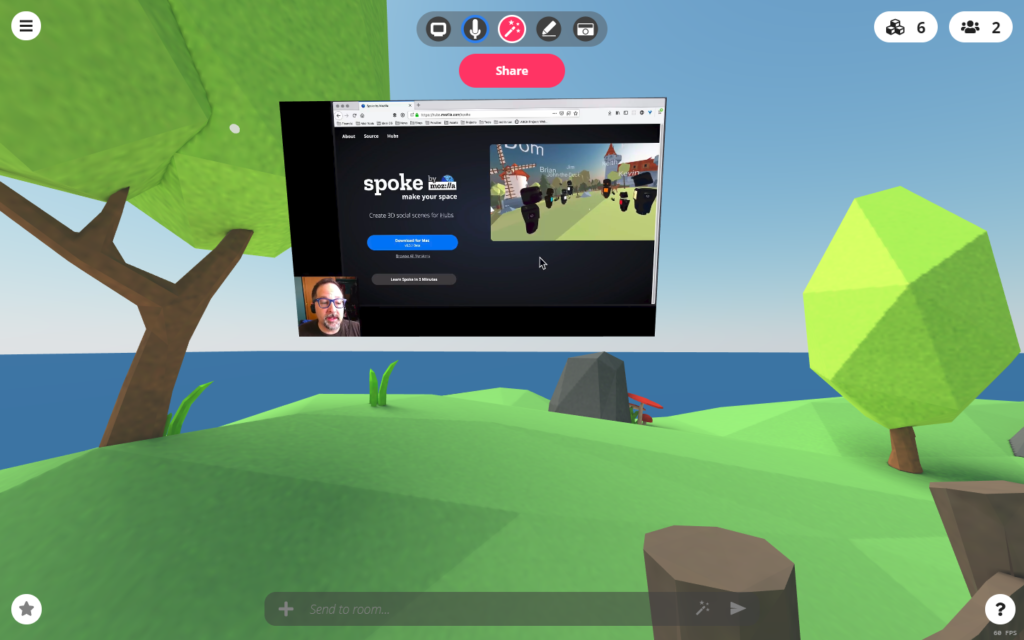
A Hubs room provides a number of sophisticated features. Participants are represented as customizable 3D avatars and can move through the space through teleportation and a number of other means depending on platform. Audio is spatialized, meaning that participants can break off into clusters to have smaller group chats without interfering with one another. You can set up a presentation by embedding a video or even sharing your webcam or PC screen.
The rooms are open to users on a number of hardware platforms and browsers, ranging from mobile devices, to laptops/desktops and a variety of VR headsets. The platform provides a seamless way to create a multi-user meeting room or social space, for free. It can be used for ‘serious’ purposes — for instance, the most recent meeting of the IEEE VR committee occurred in a Hubs room when the in-person gathering was interrupted by Covid-19. But the tagline on the Hubs landing page currently reads “Share a virtual room with friends. Watch videos, play with 3D objects, or just hang out” so it is clear that Mozilla intends Hubs for more relaxed purposes too.
Creating a Hubs Room
There are really two paths for creating a Hubs experience. The first is quite simple, and can be done by choosing from a set of templates or saved rooms, and then adding customizations from within the room. The second path involves using Spoke, which is a lightweight browser-based engine for building Hubs spaces.
Without signing in or providing additional information, you are able to join a Hubs room by following a link provided from the room owner. But to create a new room or modify an existing room by ‘pinning’ items, you’ll need to sign in. Mozilla uses a slightly different authentication flow than is common with Hubs — anytime you want to sign in you’ll get a ‘Magic Link’ in your email — click it, and you’ll be signed in. Mozilla stores no information about you, not even your email address — if you’ve previously logged in, Mozilla looks you up via a secure hash. This way, your privacy is protected.

Once you’ve clicked the link to sign in, you’ll see a button in the hubs.mozilla.com webpage allowing you to create a room. If you’ve been invited to someone else’s room, signing in may also allow you to pin items to the room and make other modifications, depending on the settings selected by your host.
When you create a room, you will automatically be provisioned a room that has a default capacity of 24 participants in full participatory mode and an additional unlimited number of ‘viewers’ who can see what is occurring in the room and ‘fly-through’ the space, but will not be visible as avatars in the room and can only interact via text chat.
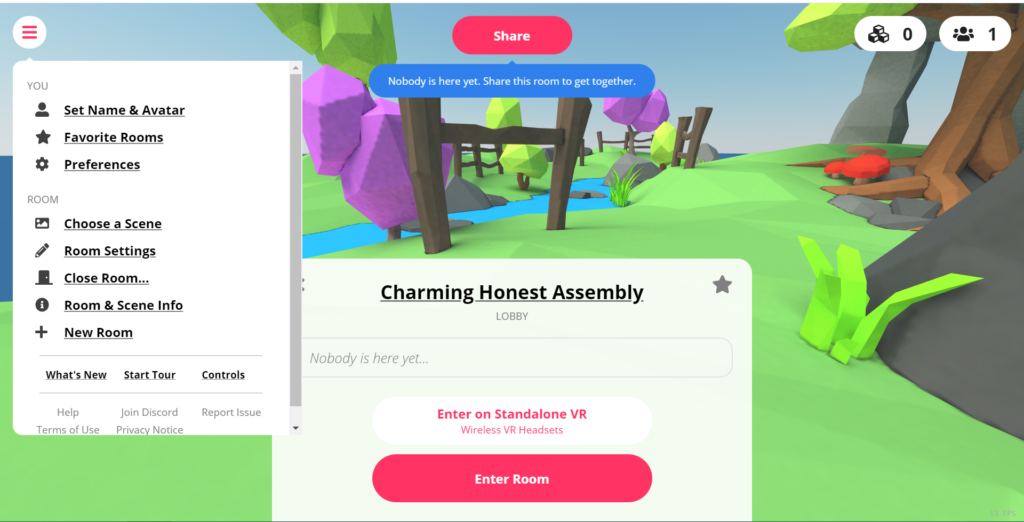
You can immediately enter the room and invite others to meet with you. Alternatively, you can do a fair amount of customization to the room before sharing it. Selecting the flyout on the left side of the screen allows you to customize your avatar details as well as make changes to the room appearance and settings.
An easy way to customize your experience is by selecting from the many room presets via the Choose a Scene button. There you’ll find a number of featured scenes contributed by both the Hubs team as well as by other users. Look through the options, and consider changing your environment to suit the needs of your event. If you’re having a board meeting, you might consider something a little more staid than if you’re having a video watching party with some friends.
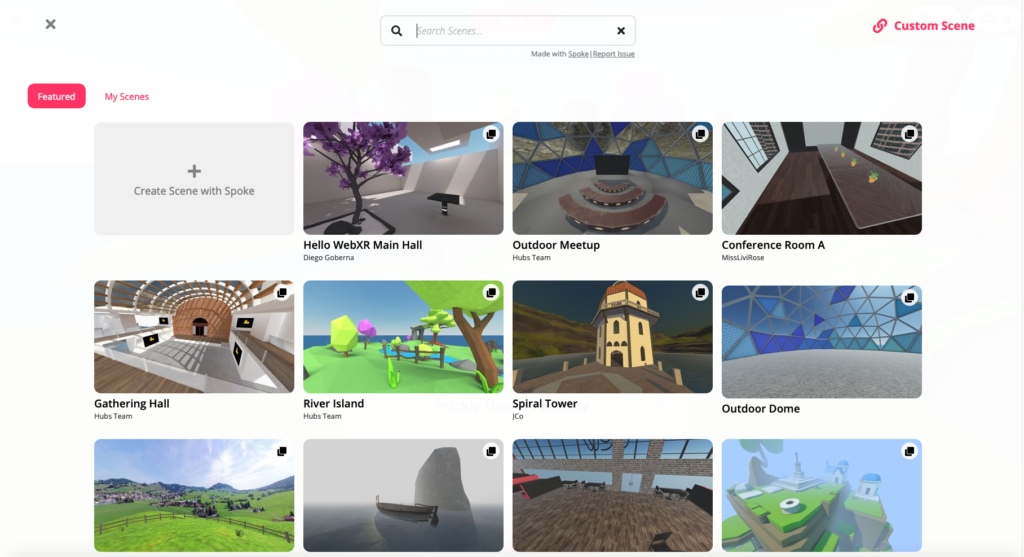
Also, consider the scale of the event — some of the indoor scenes such as ‘Cliffside Meeting Room’ will have a much more intimate feel than the ‘Outdoor Meetup’ for instance. If you don’t see the right setting for your event in the featured scenes, do a search for the kind of event you’re hosting and you should find some good options.
Once you’ve picked a good starting point, double-check your Room Settings. There are a number of options you as a host can set that will dictate how other users will be able to interact with the setting. By default, other users have a full set of permissions — they can pin objects, draw, modify and create objects, etc. So if you don’t want your invitees to move objects you’ve placed around, you’ll want to toggle this off. The same applies for any of the other permissions. You can also change your room name and add a description, for searchability.
The default room size of 24 is good for allowing a range of users on different devices to participate without bogging down the experience. If you know that all of your users are going to be joining in on high-end gaming PCs, you could potentially increase this number slightly, but in most cases the default is a pretty safe level. The audio in a Hubs room is spatialized, which can require a fair amount of processing power, so as the number of participants in a meeting increases, the audio demands of handling multiple spatialized audio streams can be very demanding, especially for more CPU limited mobile devices.
For performance reasons, you’ll also want to keep the number of objects that you spawn and pin to your scene reasonable — each additional object places a burden on processors, so add objects when they really count and not frivolously.
Keep in mind that if you have people hoping to join your meeting beyond the default 24 participants, they will still be able to experience the fly-through version of the world, they just won’t be represented in the world with an avatar, nor with their audio be available — they will still be able to use text chat and hear and see what is going on, though.
Customizing your Room
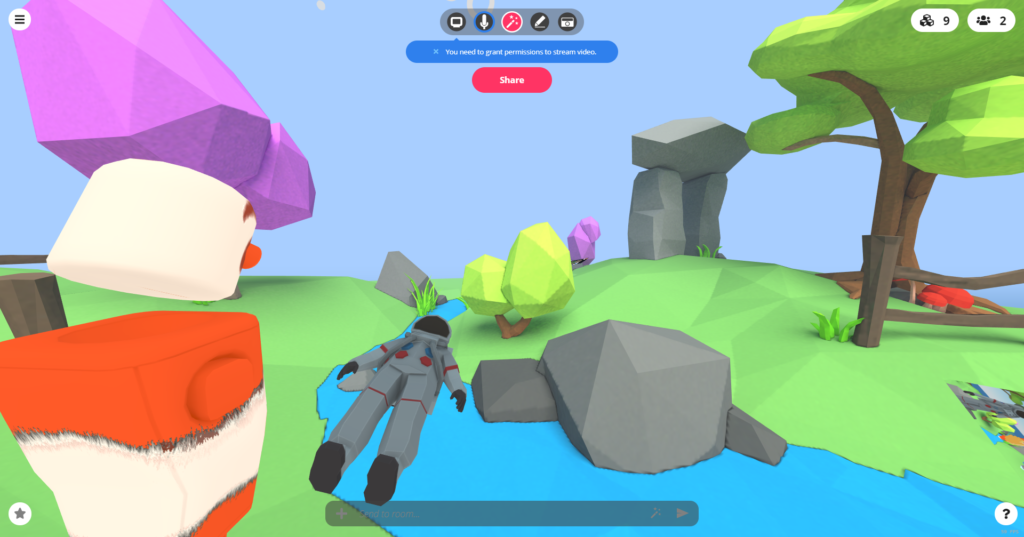
When you’re ready, join your room. There are a number of object types you can add to your room — 3D models, video, images, web pages, webcam or screen shares.
If you plan on customizing your room extensively, consider doing so on a desktop or laptop so that you can more easily type in links, etc. Then, as long as you’ve ‘Pinned’ your objects, you can fine tune the scale and placement once you’re in VR — Pinning allows you to retain any objects you place, even after the session ends.
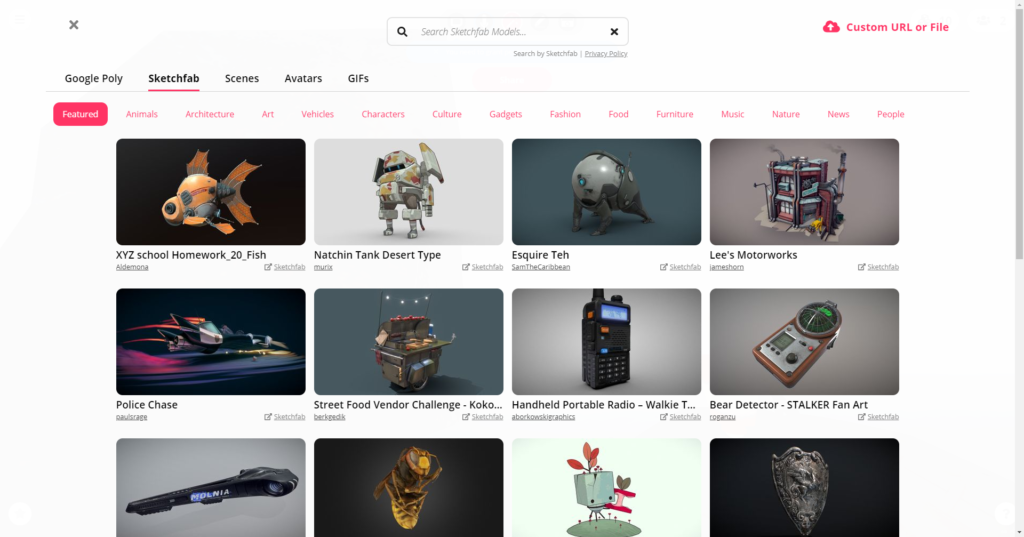
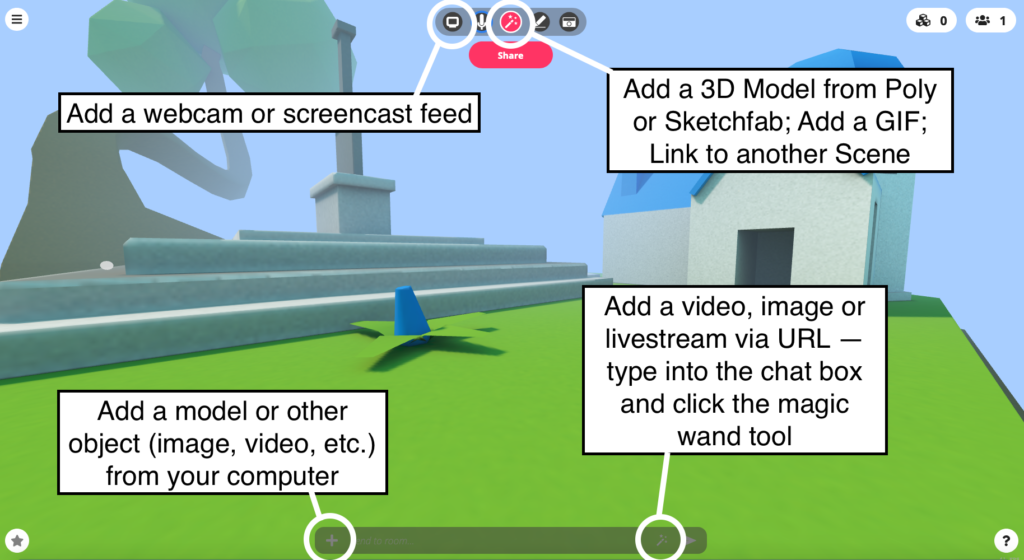
Use the ‘Create’ magic wand icon at the top of the screen to insert a model or other object into the Scene. You can seamlessly insert objects from Google Poly and Sketchfab, as well as insert GIFs. The assets from Google Poly and Sketchfab are filtered to include only those models that are able to be used due to both their size/poly count and their CC license. Hubs also conveniently assigns the correct attribution for the assets in your room description, so you don’t have to worry that you aren’t keeping up with your obligations to creators.
If you want to add a video stream, image, web page or anything else that has a URL, you can type the link into the chat window and then click the ‘Magic Wand’ icon at the bottom of the screen. Adding your webcam stream or a screenshare is done still another way, by clicking the Share Screen/Share Camera dropdown at the left of the tool bar.
To upload an asset that is stored locally on your computer, click the + icon to the left of the chat box, and navigate to your local file. Don’t ask me why the Hubs team decided to put these similar features in so many different places, hopefully they will do a UX pass on this and condense these features into a single ‘Create’ panel at some point.
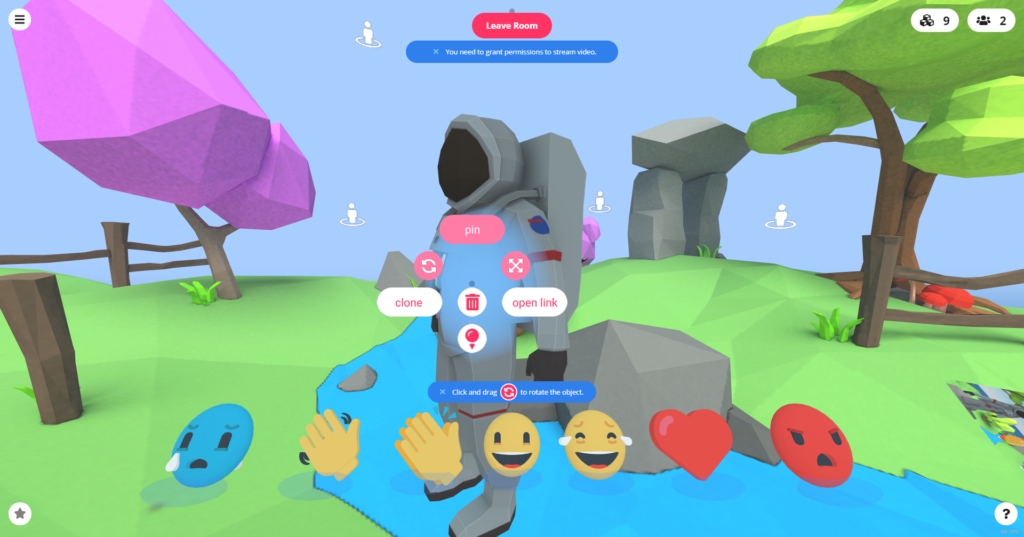
Modify objects using the Object Menu. On desktop, you’ll hover over the object with your mouse and then activate the Object menu by hitting Spacebar (If you’re not on desktop/laptop, here’s a link for the Hubs controls for other platforms https://hubs.mozilla.com/docs/hubs-controls.html). You’ll see a flyout that will allow you to Pin, delete, clone or apply gravity to the object — the mysterious circle with down arrow icon is the one for gravity.
The most important of these controls is the ‘Pin’ feature, which allows the object to persist after the session ends. If you’re planning on reusing a room and don’t want to set everything up again, this is an essential feature to know.
Spoke Overview
Maybe you’re not satisfied with simple modifications of existing user- or Mozilla-supplied Hubs rooms. Well, you’re in luck, because the Spoke application allows you to edit and design your space from (almost) scratch. Starting with a couple of empty or sparsely-populated templates, you can add models from your own collection, from a couple of included libraries, as well as from Google Poly or Sketchfab.
Building with Spoke
Recently, Spoke went fully browser based, so there is nothing to set up locally. You’ll need to sign in using the same Magic Link flow as you used for Hubs, and once you do, you can get to work creating.
Luckily, Spoke is not too difficult to learn, but if you have limited or no experience with 3D modelling software or game engines such as Unity, you’ll likely encounter a bit of a learning curve. Mozilla provides a very helpful tutorial to get you going, though, which should appear when you first load up Spoke.
One thing that helps is practicing a bit with the camera controls beyond the very brief overview provided in the tutorial. If you’ve played 3D games or used other 3D creation tools, this might feel intuitive, but if not, spend a few minutes practicing so that you’re not too frustrated going forward.
The tutorial drops you into a fairly empty ‘Crater’ scene, but if you’d like to start with something more fleshed-out, you can also check out a bunch of scenes contributed by the Mozilla Hubs Team, as well as other Hubs/Spoke users. I think it’s worth clicking over from the ‘Featured’ rooms to ‘All’ — if only because it may give you some new ideas about the kinds of space you’d like to create.
Spoke UI
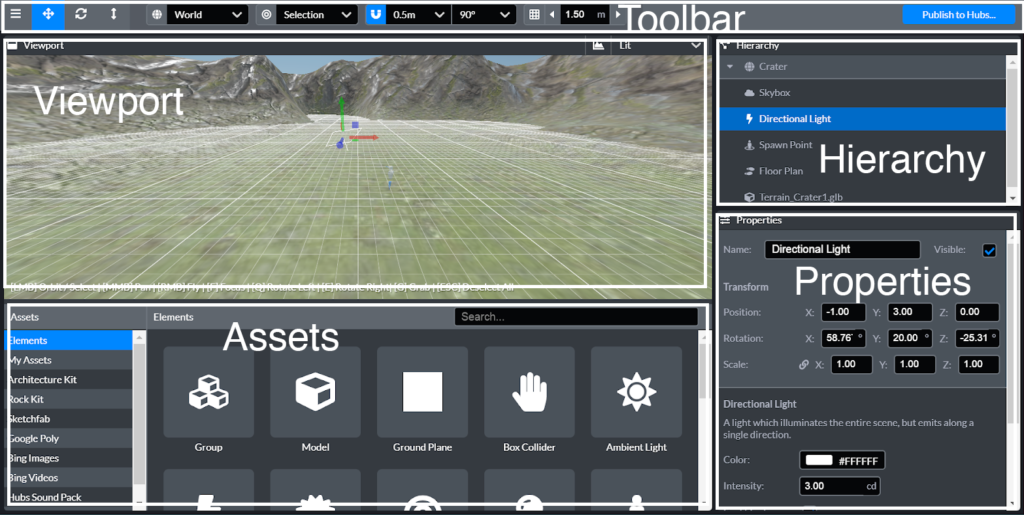
The Spoke interface includes features that will be familiar if you’ve ever used a game engine such as Unity, but may be intimidating if not. The main Viewport shows a preview of the scene, and will display icons for otherwise invisible objects such as Waypoints or Audio sources. The Hierarchy panel on the right lists all the objects in the scene. Left clicking an object in either the Hierarchy or the Viewport will select the object in both panels — this is useful if you cannot find your object visually in the Viewport.
Once an object is selected, it’s details are available in the Properties panel. The type of information displayed in the Properties panel depends on the type of object. Every object will show ‘Transform’ properties, which include Position, Rotation and Scale, along with the Name of the object and whether it is Visible. Below this, there are additional properties depending on the object, for instance for the Directional Light selected above, you can change the Color and Intensity of the light as well as modify how it casts shadows. Any object properties can be directly modified by entering new values in the Properties panel. Some of the object properties are also directly modifiable via the Viewport. You can select and object and then modify it’s position by dragging it around the scene or using the Translate tool in the Toolbar at the top of the Spoke window.
Finally, the Assets panel allows you to browse through the objects available to you, as well as upload any custom assets — these will then appear in ‘My Assets’.
Creating Your Scene
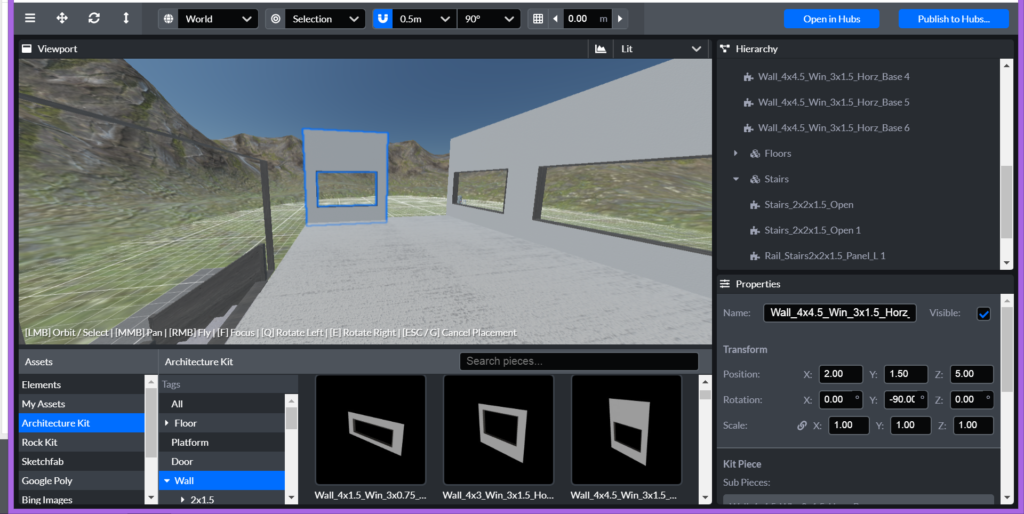
Browsing through the Assets panel, you’ll see many of the same object types that were available in Hubs, plus a few additions. In addition to Google Poly and Sketchfab models, the Hubs team has also provided a small library of models, including the Architecture Kit, Rock Kit, as well as the Hubs Sound Pack. Don’t underestimate the power of a well designed soundscape — audio is a powerful way to add immersion and polish to your experience that is often overlooked by newer VR developers.
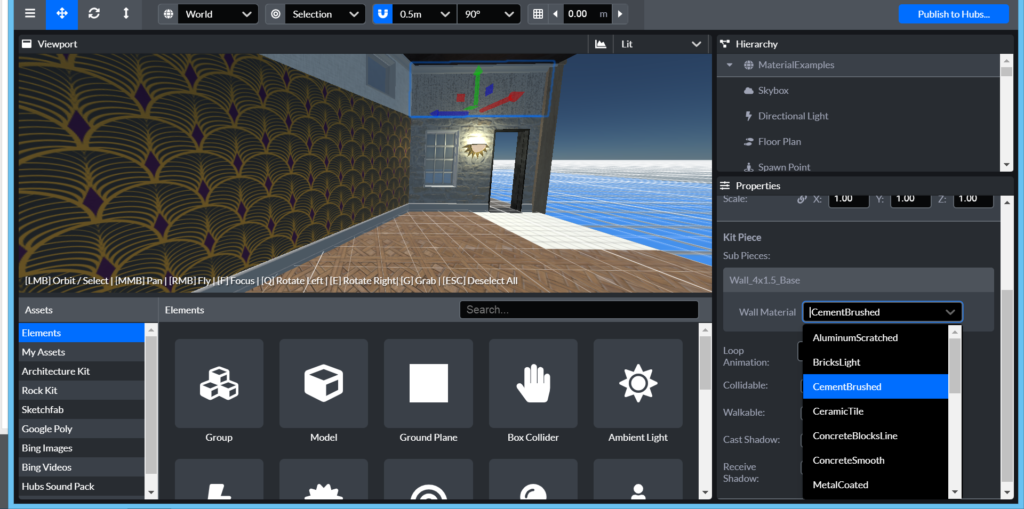
With the default snapping settings, pieces such as the Architecture Kit components should be perfectly modular and easy to fit together. If you run into trouble with snapping, though, you can change the precision settings in the Toolbar. The Kit pieces have a number of customizable materials, so that you can specify the texture used on each face of a model — for instance, you can choose to make the floor pieces brushed concrete on top and brick on the side. Using these materials settings can help customize the look of the default assets. The ‘Material Examples’ scene from the Hubs team shows the range of materials you can choose from, as seen in the screenshot below.
Under Assets, the ‘Elements’ tab is a crucial catch-all for a number of objects you’re sure to need in your room. These are especially important if you are starting from a relatively blank scene, like the default Crater. Here, you’ll find various types of lights, Waypoints and Spawn Points, as well as the placement tools for Video, Audio and Images.
Keep in mind as you spawn these types of items (Video for example), you won’t be able to replace the video source once the room is published. So if you have any plans to rotate out video sources — or to allow any future users of your Published Room to replace video for their own needs, it’s best to leave these out for now, and do the final placement of Video, Images, and possibly Audio in the active Hubs room. The volume of Audio placed in Spoke can’t be altered when the scene goes live, so if any of the Audio is critical (rather than atmospheric), it should be pinned in the Hubs scene.
If you want to create one or more Spawn Points for your users, you can do that from the Elements library. Use Spawn Points to select areas where users enter your scene — you can place more than one of these. Way Points are useful in establishing particular viewpoints where you expect users will consume content. For instance, if you are creating a room to show a video or give a presentation, you can place a waypoint on some seating, and modify the height so that the user feels as though they are seated. Again, you can place multiple waypoints in a scene.
Control the walkability of your space via the Floor Plan object in the Hierarchy. You can rebuild the navigable terrain of your room as you add objects, so that users cannot pass through them. Below, as I add a chair and side table to my room, I regenerate the floor plan so that users don’t find themselves standing in the middle of a chair.
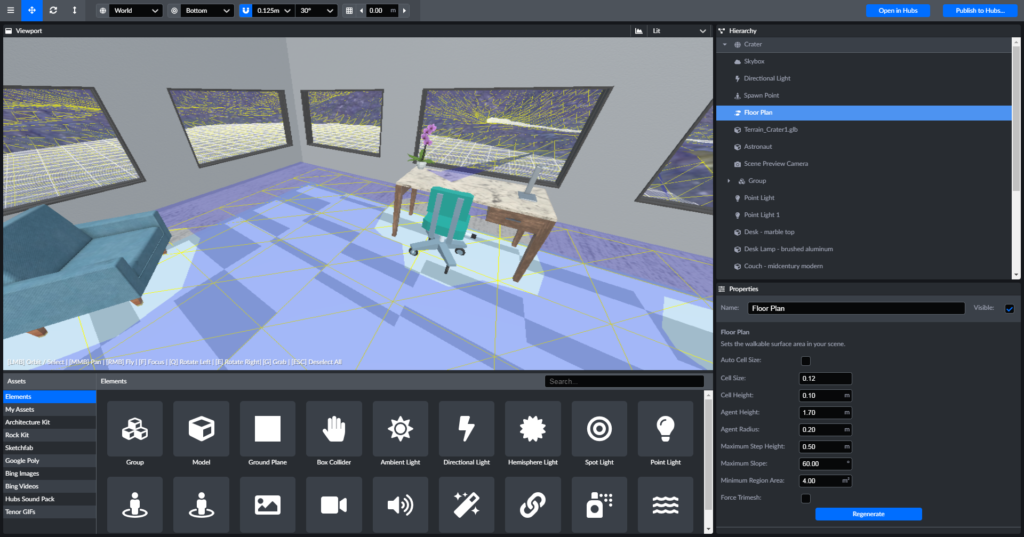
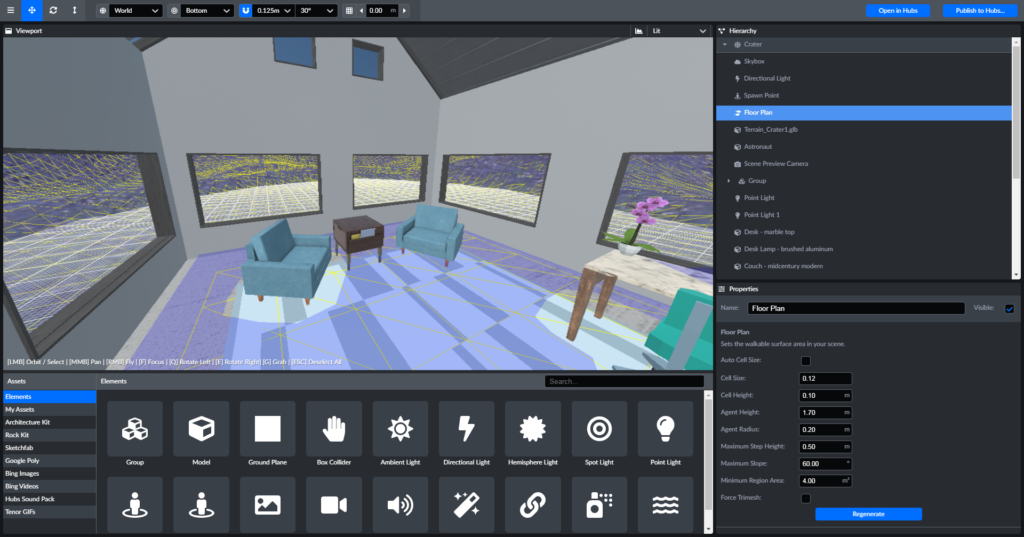
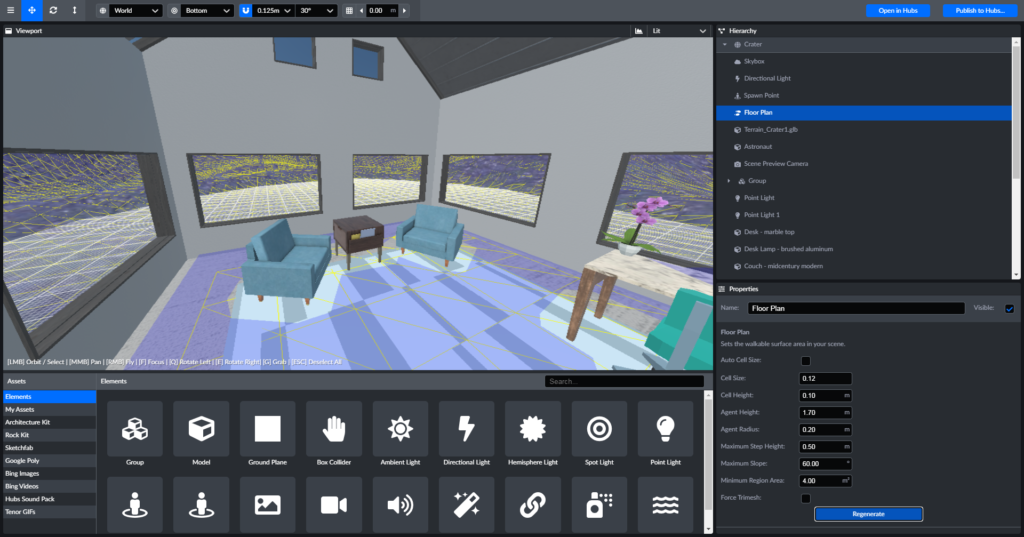
The floor plan controls also dictate how narrow or steep navigable surfaces are. For instance, if you don’t want your user to be able to walk up steep hills, you can drop the ‘Maximum Slope’ property below the default 60 degrees.
Connect Multiple Rooms
You can even connect multiple Hubs rooms together, creating a museum-like atmosphere with many connected galleries, or a main meeting hall with breakout rooms, for example. The basic way to connect to a Hubs Room is by adding a Link object to the scene. Create a new Hubs room if you don’t have one already, and then enter the URL to the desired room in your Spoke project.
It is a bit more complicated to create bidirectional links, though. Here is how you do it
- Create a two placeholder Hubs Rooms and note their URLs.
- Create two Spoke projects, with Links that point at the Hubs room URLs you just saved.
- Publish your Spoke projects.
- Go into each original Hubs room, click the flyout menu at the top-left. Select Choose a Scene. Choose the scene that contains a link to the URL of the other room.
Publishing your Scene
As you publish, you’ll see a note about the performance characteristics of your Project, as well as some suggestions for how to better optimize it for lower-powered devices. Optimization is a big topic, so if you’d like to get a better handle on how to create more performant Hubs experiences, check out this playlist by the Mozilla Hubs team:
Onward with Hubs
I hope you enjoy your time in Hubs and that you take a few minutes to try out some of the creation tools available in Hubs, or via Spoke. Hopefully this smooth experience with WebVR will encourage you to look further into browser-based XR creation. I predict that WebXR will overtake app-based experiences over the next couple of years, especially as 5G is widely adopted. Getting a start now will give you a lead on the next wave of XR creation.